|
Listen to this content!
Getting your Trinity Audio player ready...
|
The estimated reading time for this post is 9 minutes
So you want to learn how to install a plugin for your WordPress website? Read on, this article is for you…
At some point, after you’ve built your WordPress website, you’re going to come across the term ‘plugin’. A plugin is a software application that you install into your WordPress website so you can extend it’s capabilities. It’s like a ‘booster’, in the sense that it helps you get more out of what you already have.
For instance, there are plugins that can help your website function faster, save more space, add contact forms, create landing pages, optimize your images, build your website template, and so much more.
It sounds like it’s a complicated exercise to install a plugin but it doesn’t have to be. There are a couple of different methods that you can follow. In this blog post, I’m going to be covering 3 different methods.
The first one is the easiest, the second one is still achievable by tech-challenged website owners but the third one is more maybe more suited for people who have development skills. In any case, if you follow the step-by-step process outlined below with pictures you’ll be good to go. Let’s get started!
3 Methods to Install a Plugin for Your WordPress Website
Each of the methods that follow can be used in specific situations. For all intents and purposes, you’ll find that the first method, which is the easiest out of the 3, should work just fine for most of the plugins you need for your WordPress website:
1. The Easiest Method – Install a plugin directly from the WordPress plugins library
Your WordPress dashboard, which the backend area where you upload your blog post, already has a large and exhaustive list of plugins. Generally you’ll find most of the useful and relevant plugins you need as a blogger or a business owner inside of this existing library, also called the WordPress Plugin Directory.
So with this method, all you’re going to be doing is to search for a plugin using it’s name (or the closest match), locate it, and then quickly install it.
Step 1: Scroll down the list of options on the left side your WordPress dashboard until you find the one labelled ‘Plugins’
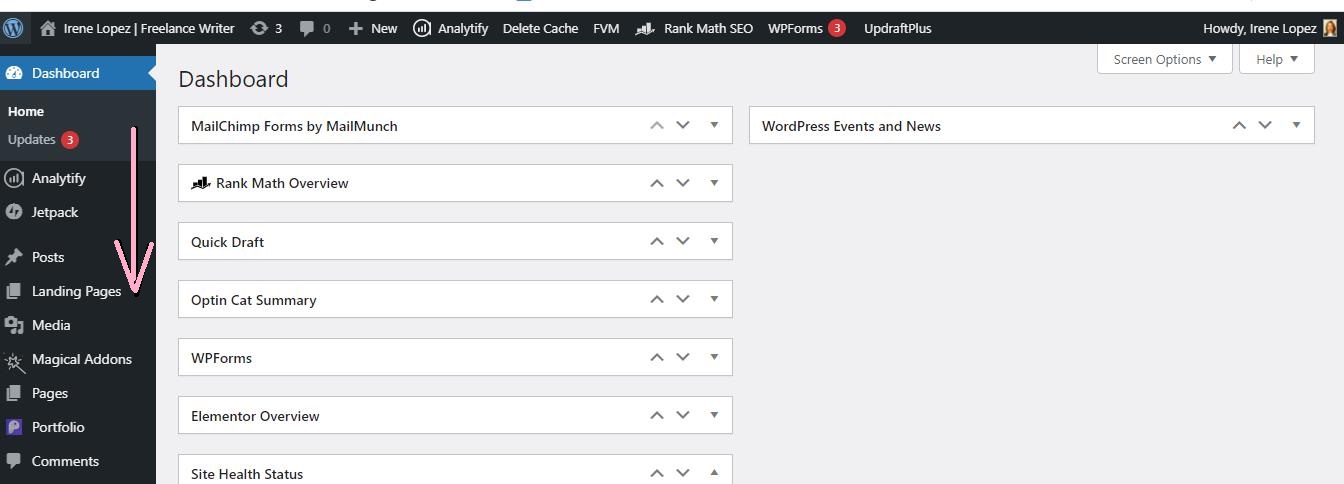
Step 2: Hover over the plugins label with your cursor until you see a black side bar listing come up on the side with three options – installed plugins, add new, and plugin editor. Click the ‘add new’ option because we’re not looking at the plugins we’ve already installed and we won’t be doing any editing to any plugins right now.
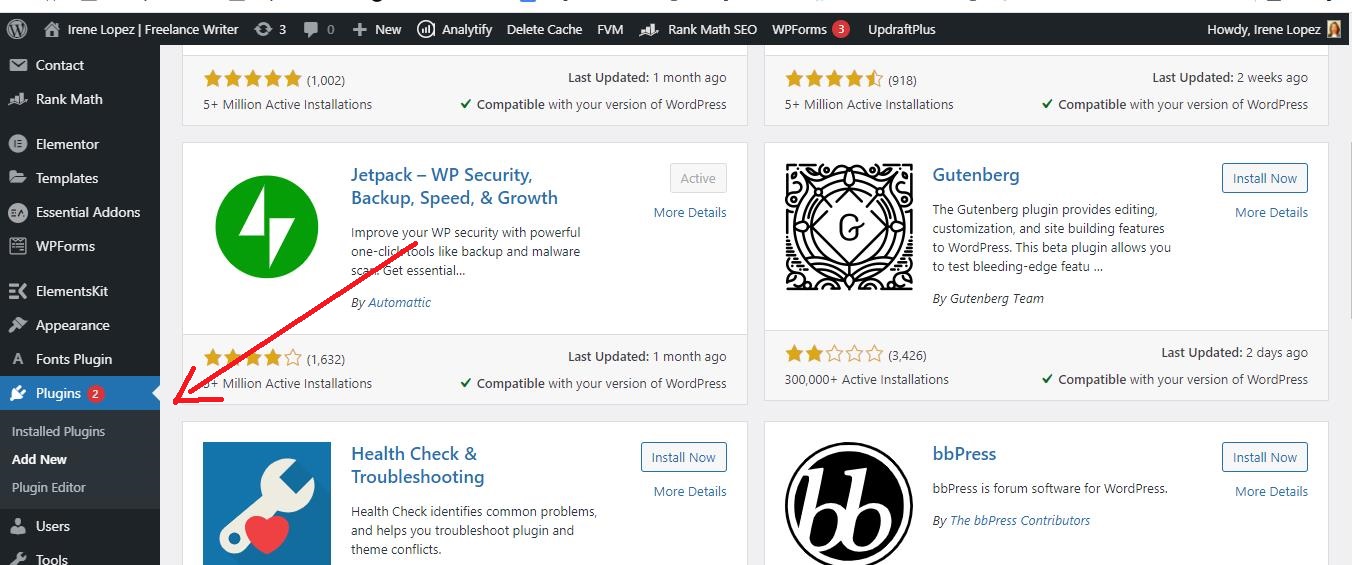
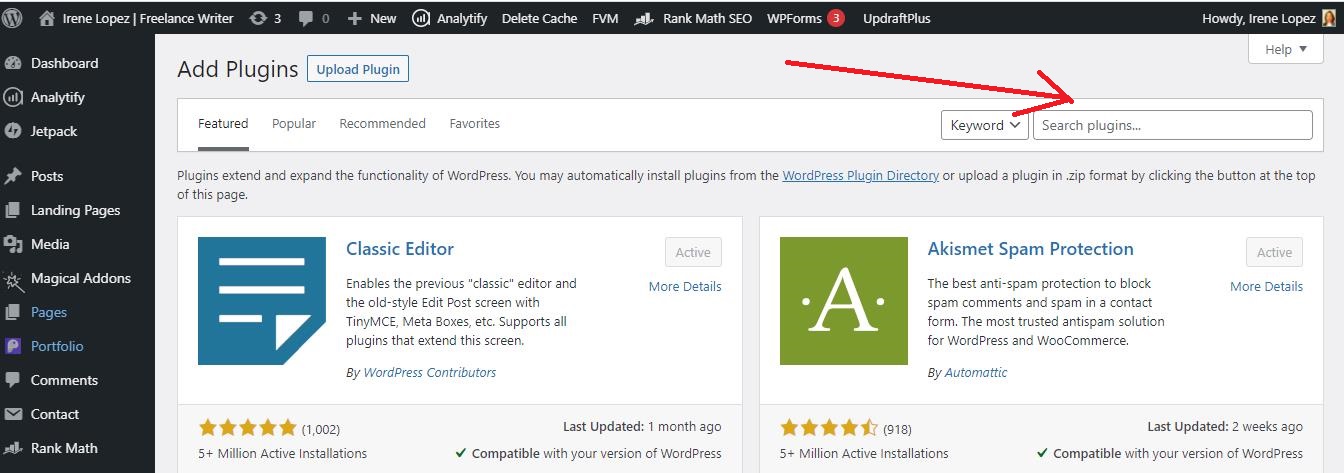
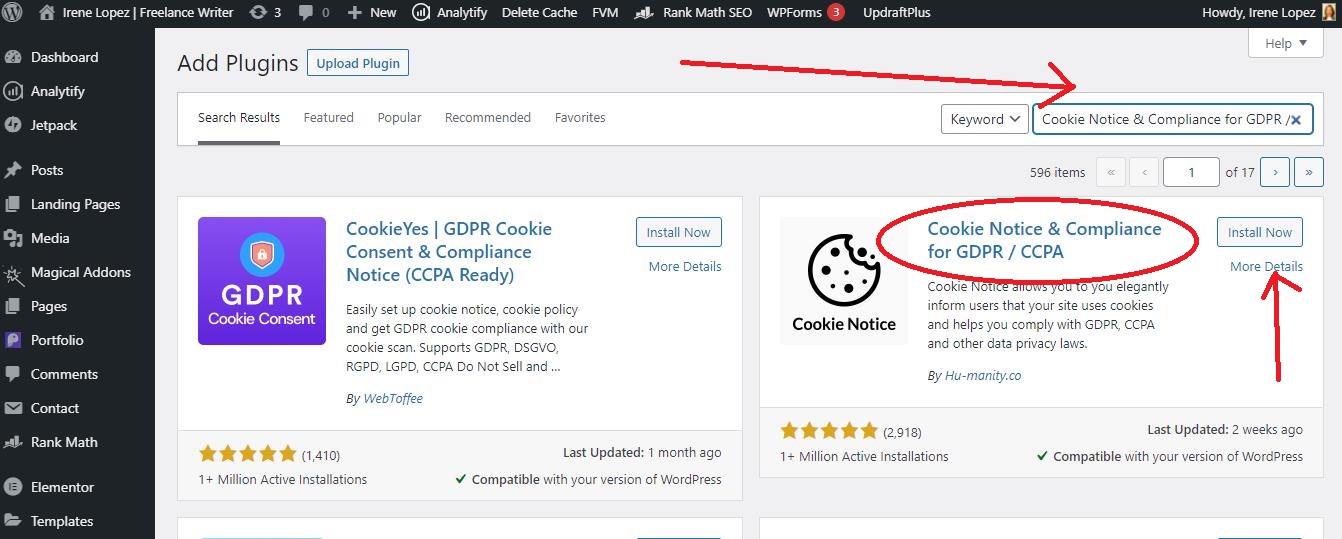
Step 3: Scroll back up to the top of the page and go to the top right-hand corner. You’ll see two boxes labelled ‘keyword’, and then ‘search plugins’. You want to type in the name of your plugin inside of the search plugins box and click enter.
Every plugin has its own unique name. Let’s say you don’t know the exact name or you just remember one or two words. Type whatever you do know into the box so it pulls up possible matches. Here, I’m looking for a plugin called ‘Cookie Notice and Compliance for GDPR/CCPA.’
When you see the exact plugin you’re looking for on the list, click the ‘install now’ label you’ll see close to it on the right side.
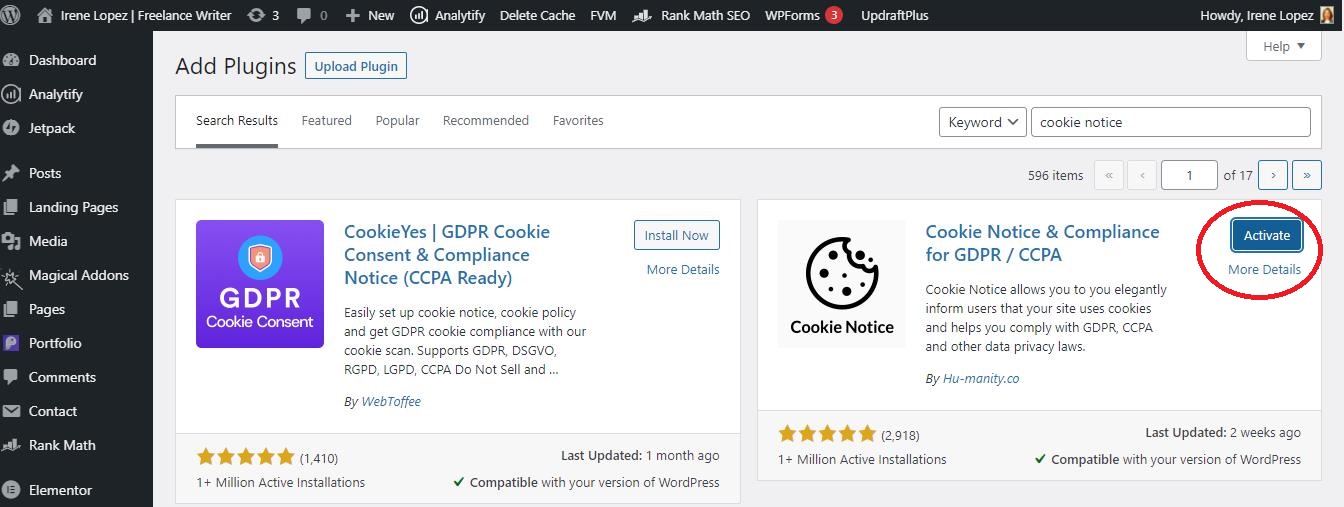
Step 4: You’ll see the ‘install now’ button change to ‘activate’. Click ‘activate’. You’ll now see the screen change to one which has a list of all the plugins you’ve already installed. Don’t worry if you see just the one in there which should be the plugin you’ve just installed.
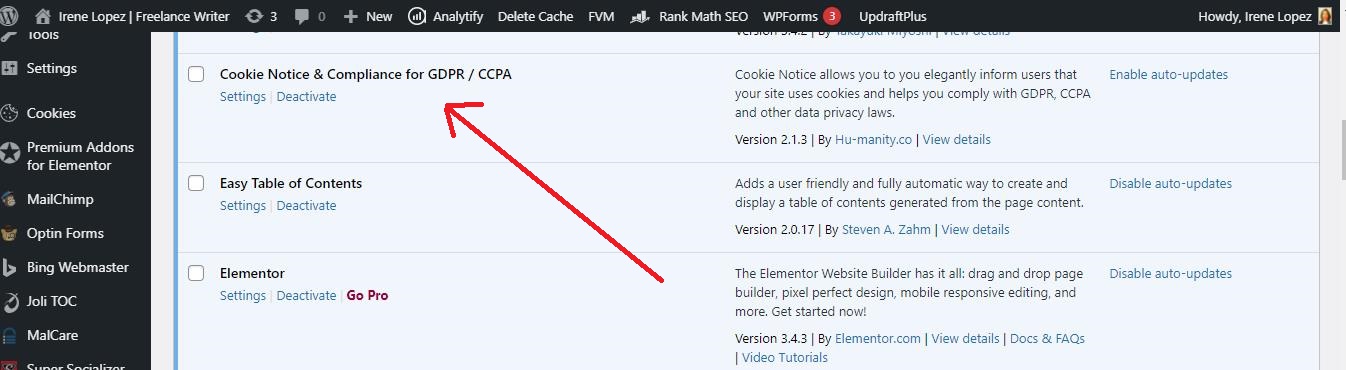
If you’ve made a mistake or you want to delete this plugin simply click the ‘deactivate’ option followed by ‘delete’.
And that’s it! Congratulations on making it all the way to the end. You just learn how to install a plugin to your WordPress website using the WordPress Plugin Directory! Woo Hoo!
2. Second Method – Install a plugin from outside WordPress using a .zip file
Let’s say that your plugin isn’t available on your WordPress Plugin Directory. When this happens, you want to download the file from it’s website (or other source as available) as a .zip file and then upload it your WordPress dashboard.
Here’s how to install a plugin on WordPress using an external .zip file:
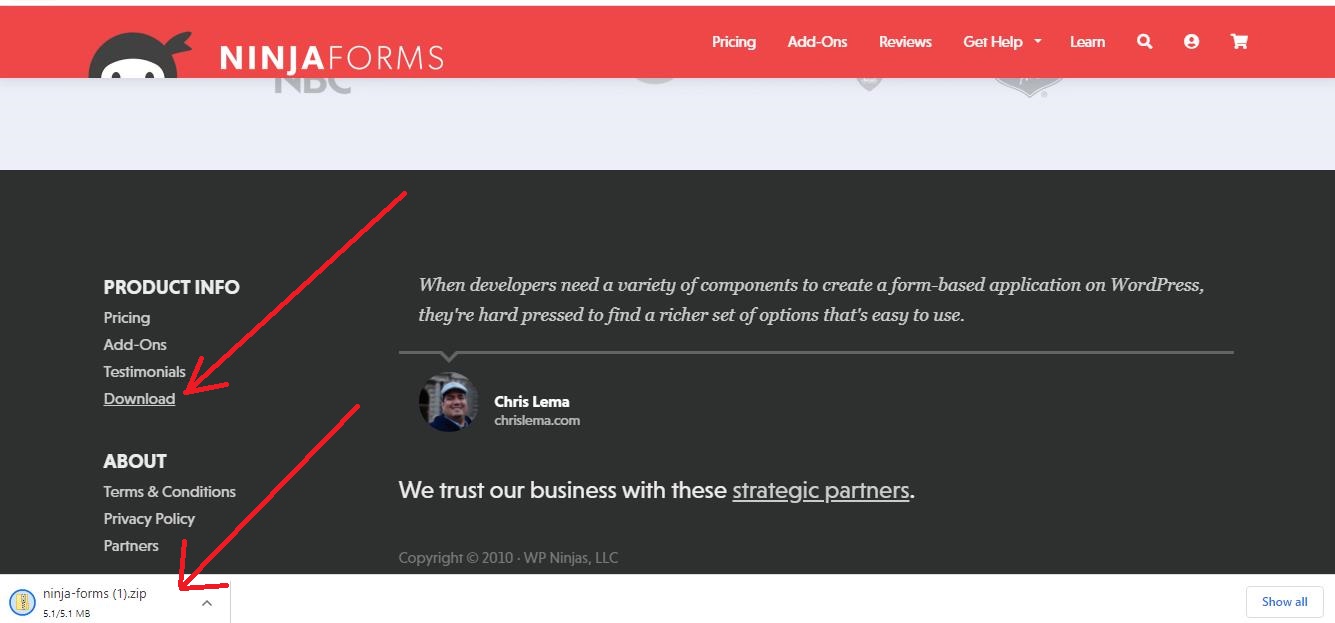
Step 1: I want to upload a plugin called Ninja Forms (Ninja Form is available on WordPress but for the sake of this exercise we’re going to assume it’s not). Search on Google for the official website of the plugin which in this case is https://ninjaforms.com/.
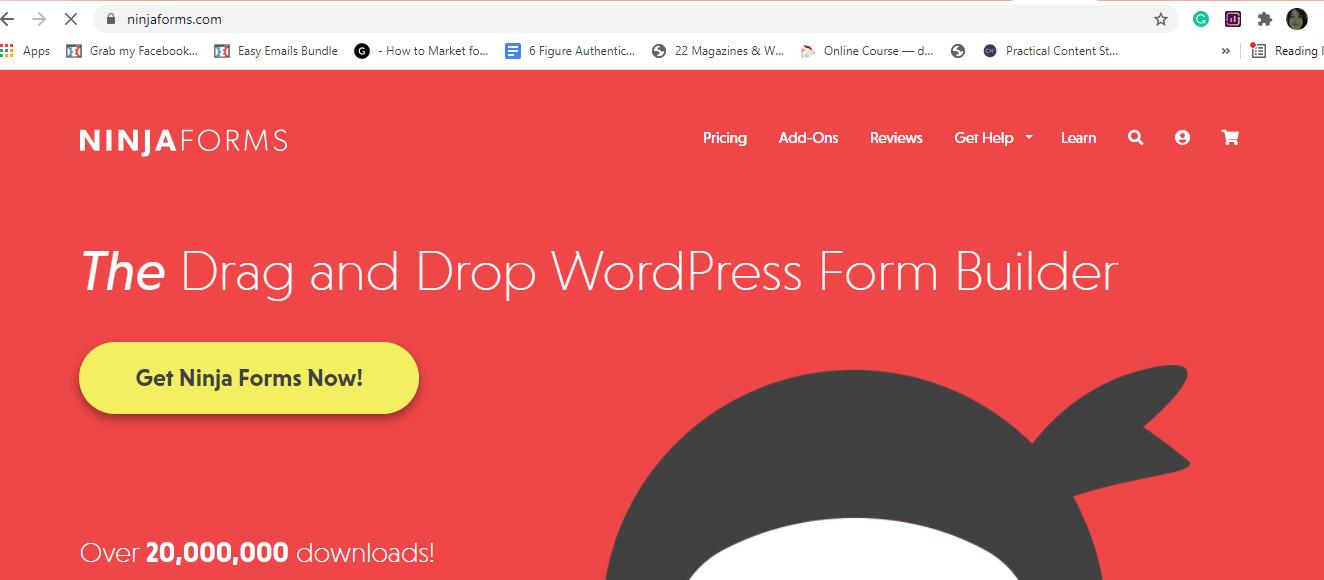
Step 2: Next, locate the download option for the free version of the plugin (unless you’re specifically looking for Ninja Form’s premium options which will have substantially more features).
In this case, you’ll find it at the bottom left of the home page. Click the ‘download’ option. A file download will appear in your menu bar on your desktop screen.
Your .zip file should now be in the ‘downloads’ of your desktop.
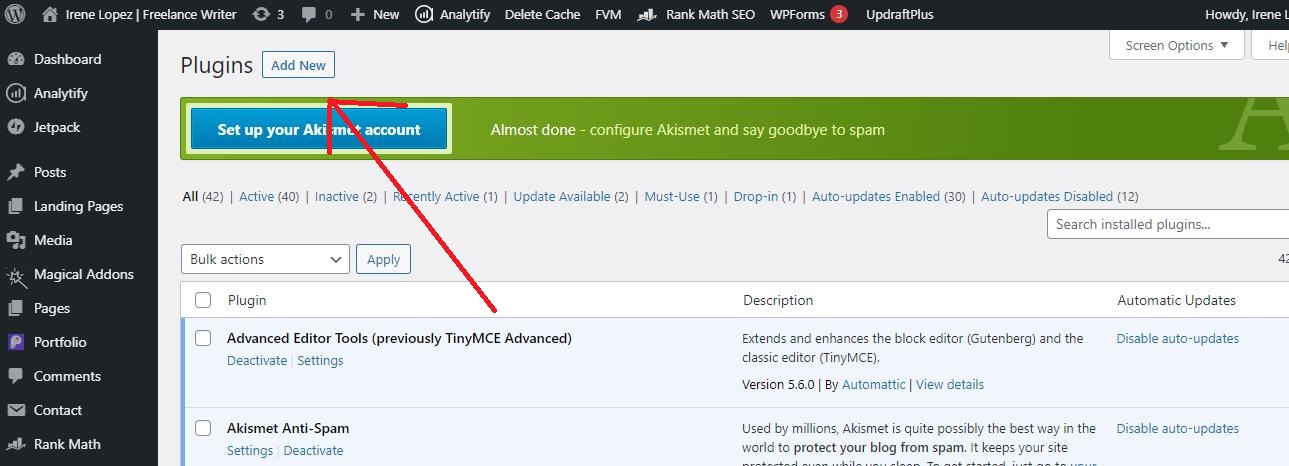
Step 3: Go to the WordPress dashboard. Scroll down the left side menu until you find the ‘plugins’ label. Click it once.
Step 4: You should be on your plugins page now which basically lists all the plugins you’ve already installed ( don’t worry if you don’t see anything there!). Scroll to the top of the screen. You’ll see the word ‘Plugins’, followed by ‘add new’. Click the ‘add new’ label.
You’ll see the ‘add new’ label change to ‘upload plugin’. Click the ‘upload plugin’ button.
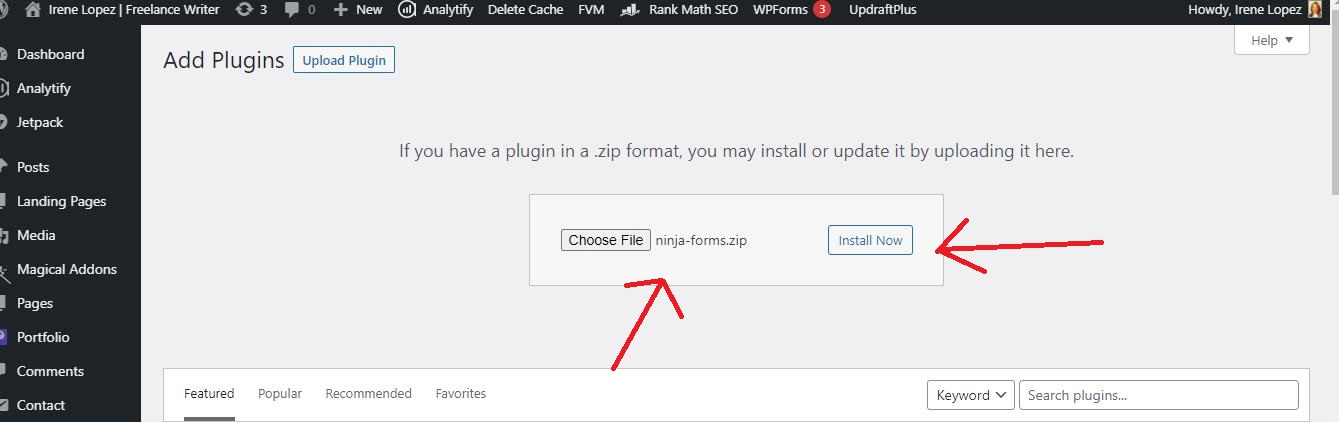
Step 5: Click the ‘choose file’ option after which you locate the file from your downloads and click open to upload the file to the WordPress dashboard.
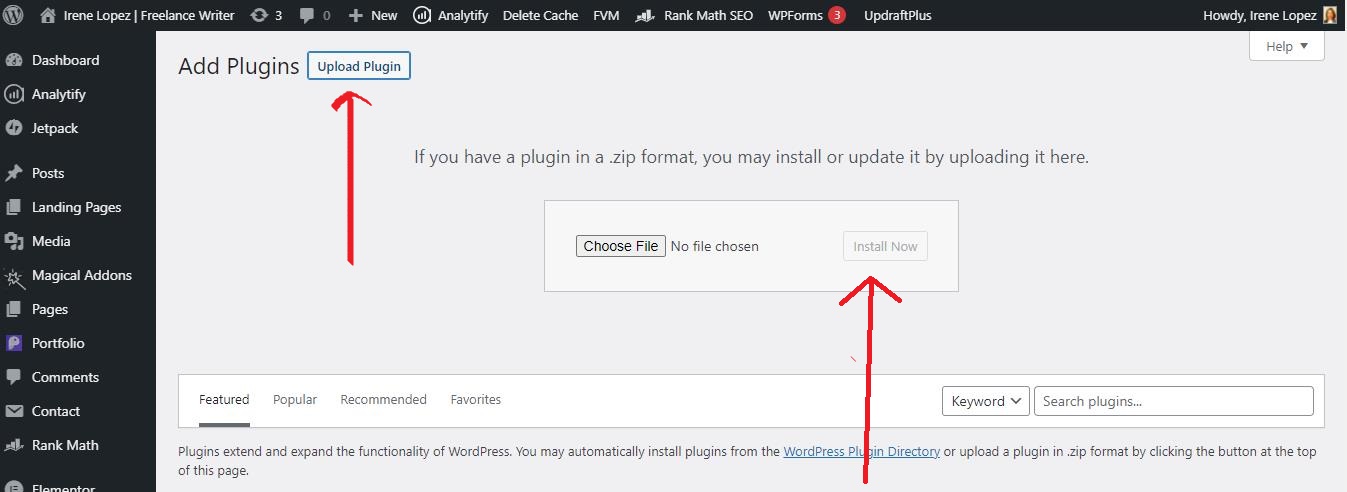
Step 6: Click the ‘choose file’ option after which you locate the file from your downloads and click ‘open’ to insert it into your WordPress dashboard.
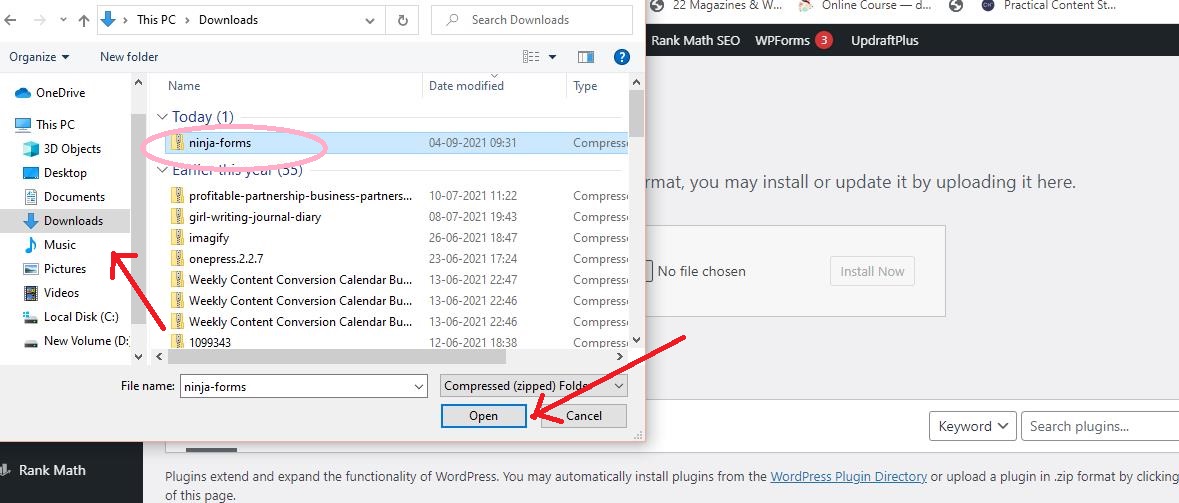
Step 7: If you’ve done this step correctly, you’ll see ninja-forms.zip (the name of your plugin followed by the .zip extension) just after the ‘choose file’ button. It just means that your file has been uploaded correctly. Click ‘Install now.’ You’ll see a new page which shows your plug in getting installed. Now click ‘Activate Plugin’.
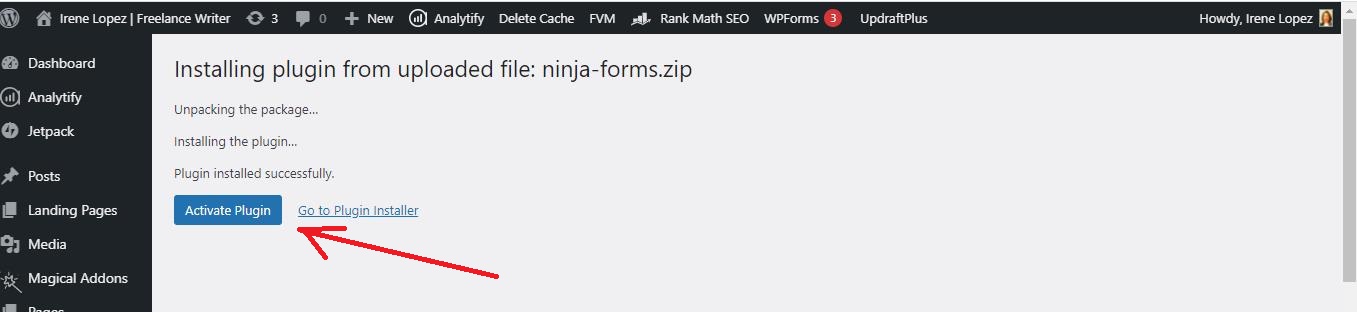
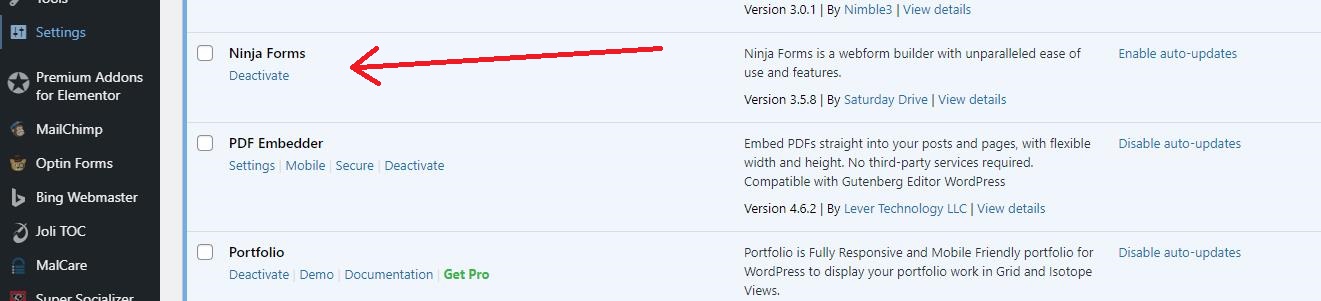
Step 8: Once you click the ‘activate plugin’, you should be led to the page you started with which had the list of all your installed plugins.
Scroll down the list and you should see your plug listed in it. When you see the plugin give yourself a big thumbs up! Congratulations! You’ve uploaded your first plugin!!
3. Third Method – Install a plugin manually using FTP
Knowing how to install a plugin manually will come in handy on the rare occasions when the WordPress Plugin Directory is down, doesn’t work, or simply isn’t available.
In this method we use what’s called an FTP (File Transfer Protocol) Manager. In very basic terms, it’s a way of transferring files between computers. This method is a bit complicated and does require a level of tech skills.
However, I’ve found that I can still do it despite being tech-challenged if I follow a step-by-step sequence. It’s the same process I’ve listed out for you here:
Step 1: Do a backup to save the existing contents of your website. For this use the first method (the easiest one!) I’ve listed above to upload a backup plugin called UpdraftPlus – Backup/Restore:
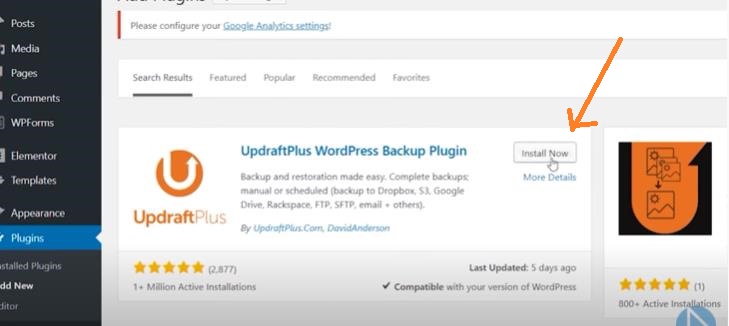
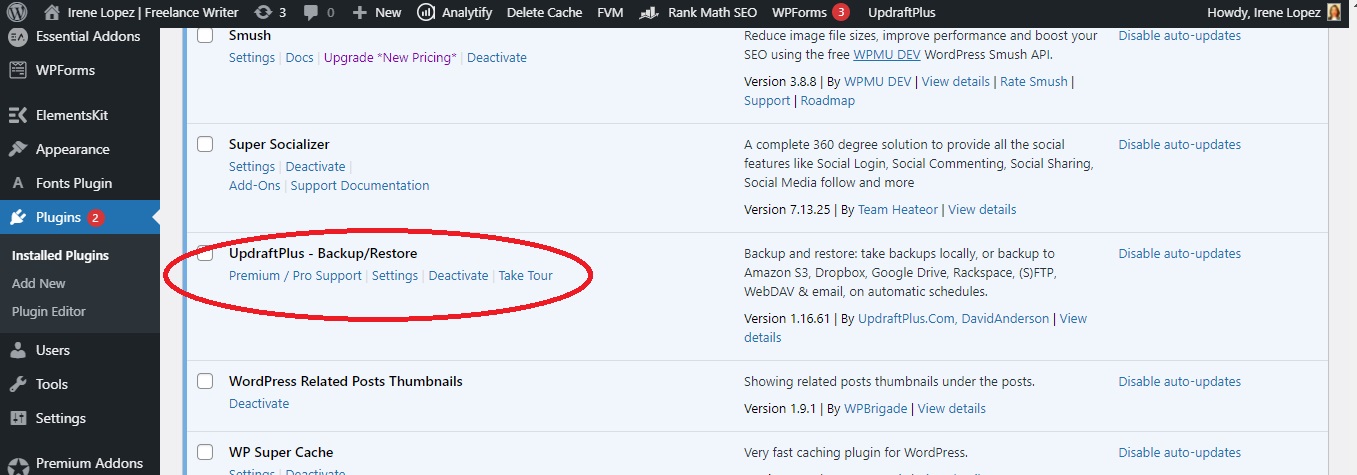
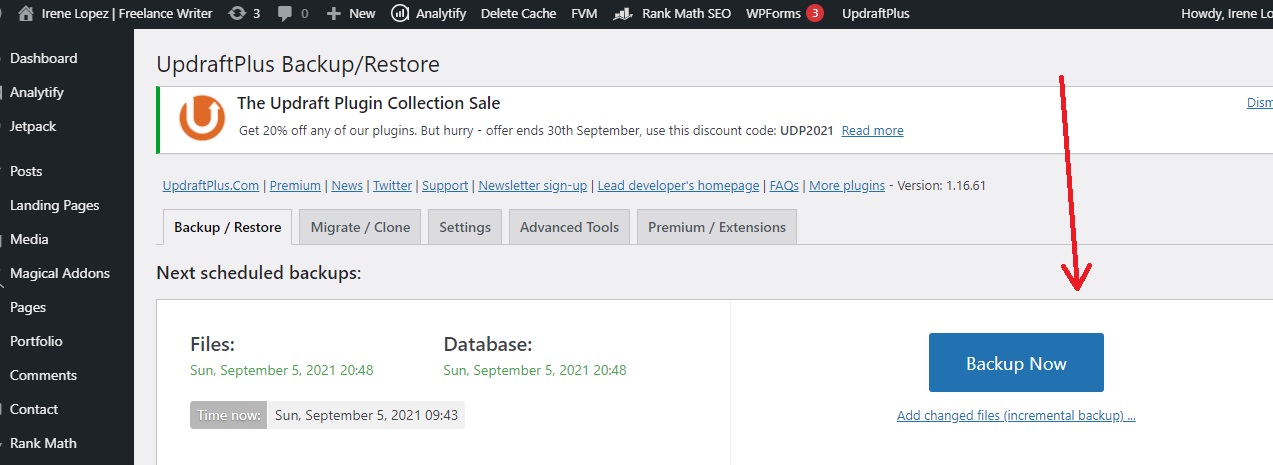
Step 2: Go to ‘settings’ just under the plugin name (see above screenshot for reference) and then click ‘BackUp Now’.
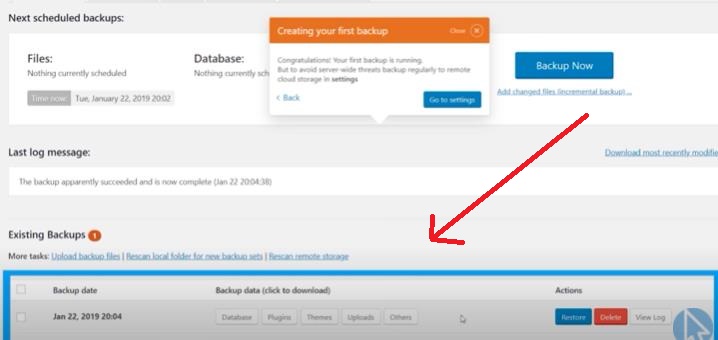
Step 3: Scroll down after this process if complete and you’ll see the backup completed on your Updraft plugin. You’ll see two options on the site for ‘Restore’ and ‘Delete’.
You need to create a back up first before you do any manual modifications just in case anything goes wrong. You don’t want to lose all the content you’ve spent so much time and effort to create. Not that there’s going to be problems, but it’s a ‘just in case’.
I’ll explain how to do a restore at the end of this tutorial.
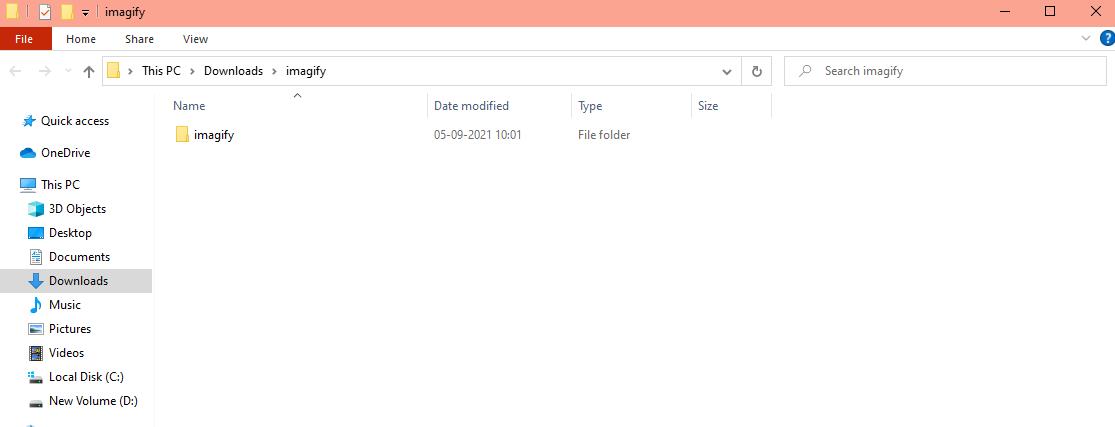
Step 4: Download the plugin from your source or official website. If your file is a compressed zip file, unzip it to get to the uncompressed files ( i.e. extract the files to your desktop or your preferred location).
To unzip go to your zip file, hover with the cursor, and right click. Click the option which says ‘Extract All’.
You’ll be prompted to add the file location which is the place where you want your files to go. If you’re not sure about the location use the ‘Browse’ option to decide and select the place where you want it to go. Click ‘Extract’.
Once this process is complete you’ll see a new popup showing you the same file but without the zip. It’s easy to visually see whether a file is zipped or not. It shows an actual zip along the length of it.
This is the unzipped file you’re going to use for the FTP method.
Step 5: You need to go into your host and access the FTP Manager. Contact your hosting provider for the FTP details and they should give you a login username and password as well.
Step 6: After you sign in, go to the ‘wp-content’ folder and look for the ‘plugins’ sub-folder. Upload your plugin file into this specific folder.
Step 7: Go to your WordPress dashboard and then scroll down the menu items on the left side until your see the label ‘plugins’. Click it once. A new page will open up where you’ll see the list of all the plugins that have been installed.
Look for your specific plugin, and click on ‘activate’ just next to it. Once that’s done, you’ve completed the installation!
How to Restore a File You’ve Backedup on UpdraftPlus
For this process go back to the Updraft plugin (Go to the WordPress dashboard and scroll down the left side menu options until you find the ‘plugins’ option. Click once – you’ll get a list of all your installed plugins. Search for the Updraft plugin.
Click ‘settings’ and scroll down to the bottom where we had created a backup earlier and click ‘restore’.
Click all the options listed in the pop up and then click ‘restore’ at the bottom of the popup.
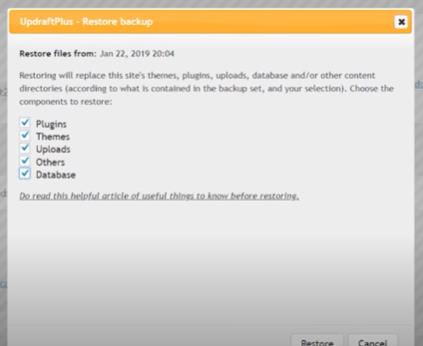
You’ll get a ‘restore’ option once again once this has been actioned by the system. Click it again, and then that’s it. Viola!, your website has been restored!
I hope you found this blog post helpful to install a plugin on your WordPress website. Also, in the meantime, enquiring minds want to know: What are your biggest challenges when it comes to setting up your professional website on WordPress?
Let me know in the comments below!

An SEO Copywriter and Digital Content Strategist based in India. I specialise in the strategic crafting of business content that increases visibility and generates organic traffic.
Email me at connect@irenelopezwriter.com or message me here